2015年6月1日 星期一

自製 V-USB k-shoot mania controller for Arduino


旋鈕製作
http://mowei-tw.blogspot.tw/2015/06/kshootmania.html

V-USB 電路接法參考
http://coopermaa2nd.blogspot.tw/2011/10/v-usb-examples-for-arduino.html

D+ , D- 改接成下面

D+ 接腳2

D-  接腳3

按鈕4~10腳
導通到GND觸發
10接腳分 短按 長按 1秒當作分隔

A0,A1一個旋鈕
A2,A3一個旋鈕

程式碼&hex:https://www.dropbox.com/s/j6nek8wpndflp4b/KshootJOY.rar?dl=0

#include "UsbJoystick.h"

class rotaryDevice {
    private:
        int analogInPin[2];
    int newValue[2];
    int oldValue[2];
    int rotarytrigger;
    unsigned long rotarytime;
    public:
        rotaryDevice(int Pin, int Pin1) {
            analogInPin[0] = Pin;
            analogInPin[1] = Pin1;
            rotarytrigger = 0;
            rotarytime = 0;

            oldValue[0] = analogRead(analogInPin[0]);
            oldValue[1] = analogRead(analogInPin[1]);
        }
    int rotaryChanged() {
        newValue[0] = analogRead(analogInPin[0]);
        newValue[1] = analogRead(analogInPin[1]);
        int rotaryresult = rotary();
        if (rotaryresult == 1) {
            rotarytrigger = 1;
            rotarytime = millis();
            return 1;
        } else if (rotaryresult == -1) {
            rotarytrigger = 2;
            rotarytime = millis();
            return 2;
        }
        if (rotarytrigger > 0) {
            if ((millis() - rotarytime) < 30) {
                if (rotarytrigger == 1) {
                    return 1;
                } else if (rotarytrigger == 2) {
                    return 2;
                }
            } else {
                rotarytrigger = 0;
            }
        }
        return 0;
    }
    int rotary() {
        int type = oldValue[0] - newValue[0];
        int type1 = oldValue[1] - newValue[1];

        if (newValue[0] > 900 || newValue[0] < 1) {
            if (abs(type1) > 15) {
                oldValue[0] = newValue[0];
                oldValue[1] = newValue[1];
                if (type1 < 0) {
                    return 1;
                } else {
                    return -1;
                }
            }
        } else if (newValue[1] > 900 || newValue[1] < 1) {
            if (abs(type) > 15) {
                oldValue[0] = newValue[0];
                oldValue[1] = newValue[1];
                if (type < 0) {
                    return 1;
                } else {
                    return -1;
                }
            }
        } else {
            if (abs(type) > 10 && abs(type1) > 10) {
                oldValue[0] = newValue[0];
                oldValue[1] = newValue[1];
                if (type < 0 && type1 < 0) {
                    return 1;
                } else if (type > 0 && type1 > 0) {
                    return -1;
                }
            }
        }
        return 0;
    }

};

//BUTTON 0~9
int But0 = 4; //4~13
int But9 = 13;
unsigned long startButTime = 0;
unsigned long startButdownTime = 0;
int startButTrigger = 0;
int startButstate = 0;
rotaryDevice rotary = rotaryDevice(A0, A1);
rotaryDevice rotary2 = rotaryDevice(A2, A3);
void setup() {
    for (int i = But0; i <= But9; i++) {
        pinMode(i, INPUT_PULLUP);
    }
    UsbJoystick.setup();
}

void loop() {
    UsbJoystick.update();

    int rotaryresult = rotary.rotaryChanged();
    if (rotaryresult == 1) {
        UsbJoystick.setButton(12);
    } else if (rotaryresult == 2) {
        UsbJoystick.setButton(13);
    }
    int rotaryresult2 = rotary2.rotaryChanged();
    if (rotaryresult2 == 1) {
        UsbJoystick.setButton(14);
    } else if (rotaryresult2 == 2) {
        UsbJoystick.setButton(15);
    }


    for (int i = 0; i < 6; i++) {
        if (digitalRead(But0 + i) == LOW) {
            UsbJoystick.setButton(i);
        }
    }

    if (startButTrigger == 0 && digitalRead(10) == LOW) {
        startButTrigger = 1;
        startButTime = millis();
    }
    if (startButTrigger == 1 && digitalRead(10) == HIGH) {
        if ((millis() - startButTime) < 1000) {
            UsbJoystick.setButton(6);
            startButstate = 1;
            startButdownTime = millis();
        } else {
            UsbJoystick.setButton(7);
            startButstate = 2;
            startButdownTime = millis();
        }
        startButTrigger = 0;
    }
    if (startButstate > 0) {
        if ((millis() - startButdownTime) < 100) {
            if (startButstate == 1) {
                UsbJoystick.setButton(6);
            } else if (startButstate == 2) {
                UsbJoystick.setButton(7);
            }
        } else {
            startButstate = 0;
        }
    }
    UsbJoystick.sendMsg();
}


k-shoot mania 旋鈕 可變電阻製作詳細說明

相關連接~
V-USB k-shoot mania controller for Arduino


這次我使用雙連後抽200K可變電阻(這個雙連後抽手感不太好阿QAQ)
因為上次改造時其中一片互換
另一方向外殼沒挖洞會造成接點夾到外殼
為了省麻煩就直接買雙連後抽

 雙連後抽200K可變電阻

接下來進行改造
把紅色圈固定用的東西拆開
從這個方向比較好施工
拆開後比較容易拿尖嘴鉗或剝線鉗進去施工


拿尖嘴鉗或剝線鉗把紅圈地方壓平
並轉轉看會不會被卡到
這樣就完成可變電阻無限旋轉了


再來照電路圖接線


硬體部分OK

Arduino 測試程式

const int analogInPin = A0;
const int analogInPin1 = A1;
void setup() {
  Serial.begin(9600); 
}
void loop() {
  Serial.print("val0 = " );                       
  Serial.print(analogRead(analogInPin));      
  Serial.print("\tval1 = " );                       
  Serial.println(analogRead(analogInPin1));      
  delay(200);                     
}

旋轉可變電阻(用雙連後抽小心別碰到後面的接點會影響數值)
確定旋轉同一方向
兩邊數值同時上升或同時下降
你會發現
當數值0在往下轉時換變成1019(沒到1023可能是1K歐姆電阻分壓到)
0到最大值中間有出現900以上的數值(不確定產生的原因...)


寫個左轉+1 右轉-1的測試程式
濾掉不可靠的區域 0以下 900以上
當其中一片在此區域時不理會他,採另外一片的數值當參考
沒問題的話就已經成功了~

const int analogInPin = A0;
const int analogInPin1 = A1;
int newValue[2]={0,0};
int oldValue[2]={0,0};
int count = 0;
void setup() {
    Serial.begin(9600);
  oldValue[0] = analogRead(analogInPin) ;
  oldValue[1] = analogRead(analogInPin1) ;
}
void loop() {
    newValue[0]=analogRead(analogInPin);
    newValue[1]=analogRead(analogInPin1);
    rotary(oldValue,newValue);

    delay(10);
}
void msg(int outputValue,int outputValue1) {
    Serial.print(" outputValue: = ");
    Serial.print(outputValue);
    Serial.print("\tval: = ");
    Serial.print("\toutputValue1: = ");
    Serial.print(outputValue1);
    Serial.print("\tval: = ");
    Serial.println(count);
}
int rotary(int oldval[2],int newval[2])
{
    int type = oldval[0] - newval[0];
    int type1 = oldval[1] - newval[1];

    if (newval[0] > 900 || newval[0] < 1) {
        if (abs(type1) > 20) {
            oldval[0] = newval[0];
            oldval[1] = newval[1];
            if (type1 < 0) {
                count++;
                msg(newval[0],newval[1]);
            } else {
                count--;
                msg(newval[0],newval[1]);
            }
        }
    } else if (newval[1] > 900 || newval[1] < 1) {
        if (abs(type) > 20) {
            oldval[0] = newval[0];
            oldval[1] = newval[1];
            if (type < 0) {
                count++;
                msg(newval[0],newval[1]);
            } else {
                count--;
                msg(newval[0],newval[1]);
            }
        }
    } else {
        if (abs(type) > 10 && abs(type1) > 10) {
            oldval[0] = newval[0];
            oldval[1] = newval[1];
            if (type < 0 && type1 < 0) {
                count++;
                msg(newval[0],newval[1]);
            } else if(type > 0 && type1 > 0) {
                count--;
                msg(newval[0],newval[1]);
            }
        }
    }
}


2015年5月30日 星期六

k-shoot mania旋鈕 自製成功!

客官看圖~


開始拆解改裝

再來就是開心的解除封印的時間了呵~
紅圈就是卡住旋轉的地方
把它弄平就OK了~!


組裝回去其中一片方向改變
然後你會發現其中一個電組怎麼量都是0.............

接點都被外殼夾住了當然怎麼量都是0阿!!!
只好再拆開來貼個絕緣膠帶
轉轉看會不會妨礙選轉
沒問題就改造好了~!
電路長這樣~


以下隨便接XD


測試程式:
const int analogInPin = A0;
const int analogInPin1 = A1;
int newValue[2]={0,0};
int oldValue[2]={0,0};
int count = 0;
void setup() {
    // initialize serial communications at 9600 bps:
    Serial.begin(9600);
    
  oldValue[0] = analogRead(analogInPin) ;
  oldValue[1] = analogRead(analogInPin1) ;
}

void loop() {
      
    newValue[0]=analogRead(analogInPin);
    newValue[1]=analogRead(analogInPin1);
    rotary(oldValue,newValue);

    delay(10);
}
void msg(int outputValue,int outputValue1) {
    Serial.print(" outputValue: = ");
    Serial.print(outputValue);
    Serial.print("   val: = ");
    Serial.print(" outputValue1: = ");
    Serial.print(outputValue1);
    Serial.print("   val: = ");
    Serial.println(count);
}
int rotary(int oldval[2],int newval[2])
{

    int type = oldval[0] - newval[0];
    int type1 = oldval[1] - newval[1];

    if (newval[0] > 900 || newval[0] < 1) {
        if (abs(type1) > 20) {
            oldval[0] = newval[0];
            oldval[1] = newval[1];
            if (type1 < 0) {
                count++;
                msg(newval[0],newval[1]);
            } else {
                count--;
                msg(newval[0],newval[1]);
            }
        }
    } else if (newval[1] > 900 || newval[1] < 1) {
        if (abs(type) > 20) {
            oldval[0] = newval[0];
            oldval[1] = newval[1];
            if (type < 0) {
                count++;
                msg(newval[0],newval[1]);
            } else {
                count--;
                msg(newval[0],newval[1]);
            }
        }
    } else {
        if (abs(type) > 10 && abs(type1) > 10) {
            oldval[0] = newval[0];
            oldval[1] = newval[1];
            if (type < 0 && type1 < 0) {
                count++;
                msg(newval[0],newval[1]);
            } else if(type > 0 && type1 > 0) {
                count--;
                msg(newval[0],newval[1]);
            }
        }
    }
}


結論:
可變電阻兩片方向相反就是為了泥補這一區段
之後利用程式如其中一片在這範圍就不考慮,只考慮另一片
1K歐姆電阻是拿來限流用,盡量不要影響後面可變電阻分壓
1M歐姆電阻是接腳空接時拉5V下來,不要有雜訊
而且1M夠大跟可變電阻並連時不影響電阻值
補個影片~


2015年5月29日 星期五

k-shoot mania 旋鈕 第二戰


 題外話...

 用寶特瓶做的小馬達固定架!!
大小剛好呢~
旋鈕也從寶特瓶蓋換成了鋁製旋鈕~


可是洞好像有點大ˊˇˋ....
讓我探討可變電阻與小馬達結合的可能性.....
才能塞進特別買的鋁製殼..

失敗了呢........(哭
以上屍體


1.
為了讓可變電阻有點貢獻
就用可變電阻做做看旋鈕好了

解除封印!!
只要打掉外面凹槽就可以讓可變電阻無限旋轉~!!!
其實裡面在旋轉時有塊塑膠突出物會卡到凹槽,就不能轉了
要馬幹掉塑膠,不然就把凹槽弄掉
然後寫段簡單的程式碼
const int analogInPin = A0;
int sensorValue = 0;
int oldval = 0;
int count = 0;
void setup() {

    Serial.begin(9600);
}

void loop() {

    sensorValue = analogRead(analogInPin);
    int outputValue = map(sensorValue, 0, 1023, 0, 255);

    int type = oldval - outputValue;
    if (abs(type) > 240) {
        oldval = outputValue;
        if (type < 0) {
            count++;
        } else {
            count--;
        }
        Serial.print(" outputValue: = ");
        Serial.print(outputValue);
        Serial.print("   val: = ");
        Serial.println(count);
    } else if (abs(type) > 5) {

        oldval = outputValue;

        if (type > 0) {
            count++;
        } else {
            count--;
        }

        Serial.print(" outputValue: = ");
        Serial.print(outputValue);
        Serial.print("   val: = ");
        Serial.println(count);

    }
    delay(10);
}


電路


結果


大部分沒問題
只不過0跳到255 這區間旋鈕要轉一小段才會出現變化
就是紅色區域範圍

簡單來說就是失敗了惹~
不在意那小區塊的倒是可以試試

2015年5月27日 星期三

製作 k-shoot mania 旋鈕問題


相關連接~
kshootmania旋鈕 自製成功!
kshootmania 旋鈕 可變電阻製作詳細說明 

來源:http://www.nicovideo.jp/watch/sm20783694

買了旋轉編碼器因為不是光柵的手感非常不好...
決定還是用小馬達來做

就如上圖電路那樣那樣,成果不錯。(我IC用LM393,圖為LM358)
我把兩個47歐姆條小增加靈敏度


1.
不過....我在做第二個旋鈕時。

同樣的電路......同樣IC只是不同顆...結果不一樣....
在我一天的測試下發現第2.5接腳有補償小正電壓(推測)
因為馬達旋轉改變的電壓很小(慢慢轉連5mV 都不到)
電阻分壓出小電壓當作比較來源
而補償的小正電壓比分壓的來源還大
用上圖來表達就是比較器比較時馬達端的電壓(接腳二)會比靠近正電的47歐姆(接腳三)還大

解決辦法把上半段47歐姆條大拉開壓差

2.
然而上半段調整好靈敏度
調整下半段47歐姆...恩都把47歐姆拔了
怎還不靈敏.....這可恨的補償電壓...

最後電路變成這樣...

接腳六在奇怪的位子上了WW
接腳五電壓還比接腳六大...


建議先調5.1歐姆在調3.9歐姆


也可以用好幾條分壓當作輸入來源
靈敏度用可變電阻條

3.
本來想靠程式來作旋鈕
可是ATMEGA328 類比精確度10bit
5/1024=0.0048828125v
馬達旋轉的電壓比這個還小....
除非你快轉.....
不然就加OPA放大
好處是不用調整外部電路條靈敏
改程式就OK

原本想法:
馬達未轉時2.5V
旋轉時在2.5V上下移動

精確度不夠讀不到小數點後幾位的數字....
而且雜訊超多~~~

2015年5月24日 星期日

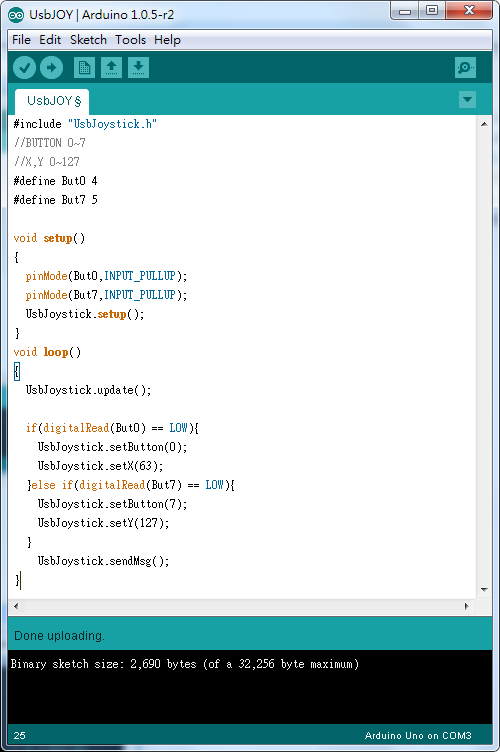
V-USB Joystick for Arduino

上次做好沒存檔

這次再翻出來從弄一次...QAQ
花了我一天阿阿阿阿

D+ 接腳2
D-  接腳3
詳情請看usbconfig.h

想改搖桿配置可以用
HID Descriptor Tool
改完記得回usbconfig.h填
USB_CFG_HID_REPORT_DESCRIPTOR_LENGTH
長度


程式碼:https://www.dropbox.com/s/n0rgkb370wto2lv/UsbJOY.rar?dl=0

2015年1月16日 星期五

IIS wwwroot 無法寫入

把裝好的CMS 移到這目錄(wwwroot)底下
馬上噴這段訊息給我看

\wwwroot\craft\config isn't writable by PHP. Please fix that.

只要在資料夾上加上IUSR使用者
並設定擁有寫入權限就可以了

預測2031/1/1可能 TWCA 憑證 IOS會出現不信任

緣由: TWCA CYBER Root CA 有兩張、兩個效期 (2030、2047年到期) 推測TWCA 預計 2030年12月會停用: TWCA CYBER Root CA (2030 年到期) TWCA Global Root CA 改用啟用: TWCA CYBER ...